Events
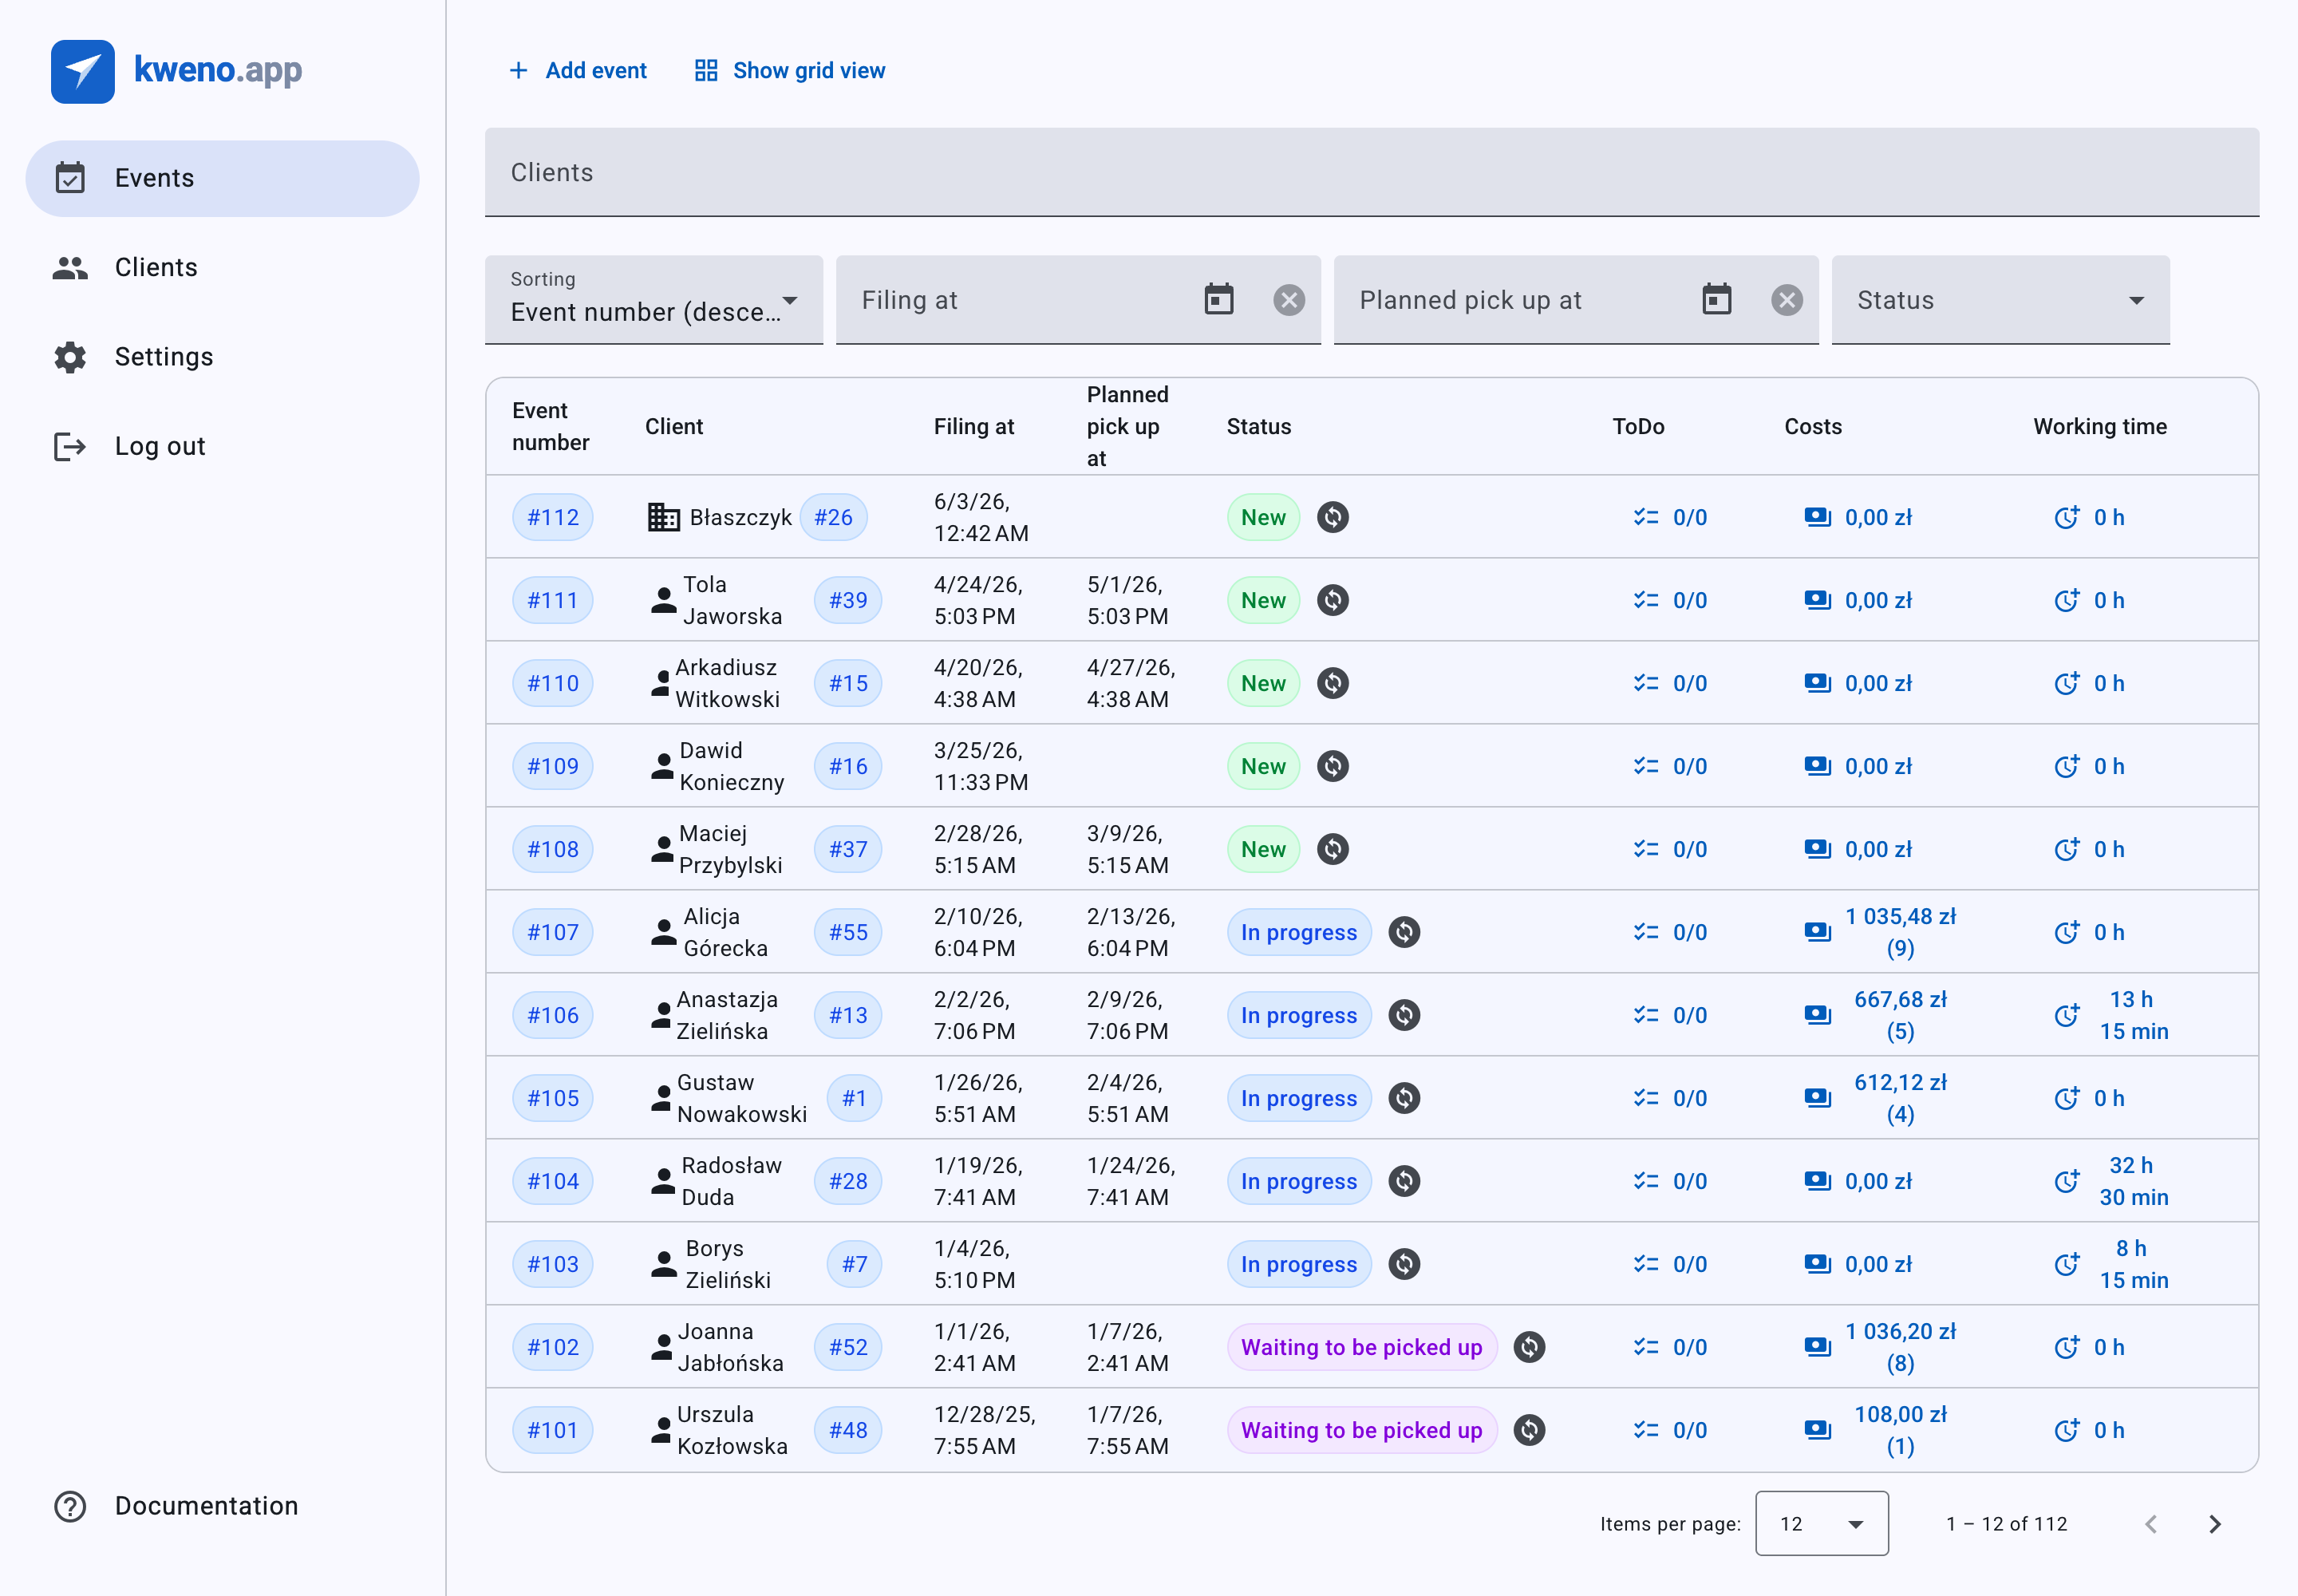
An event is a single service or repair job you carry out for a client. It is the central record in kweno.app: you create it when a client drops something off, then build it up over time with Costs, Working time, To-dos and attached files, watch it move through its statuses, and finally turn it into an invoice. Everything you do for one job hangs off its event.
Open the events list from the app navigation. From there you create new events, browse and filter existing ones, and reach every sub-view of a job.
Create an event
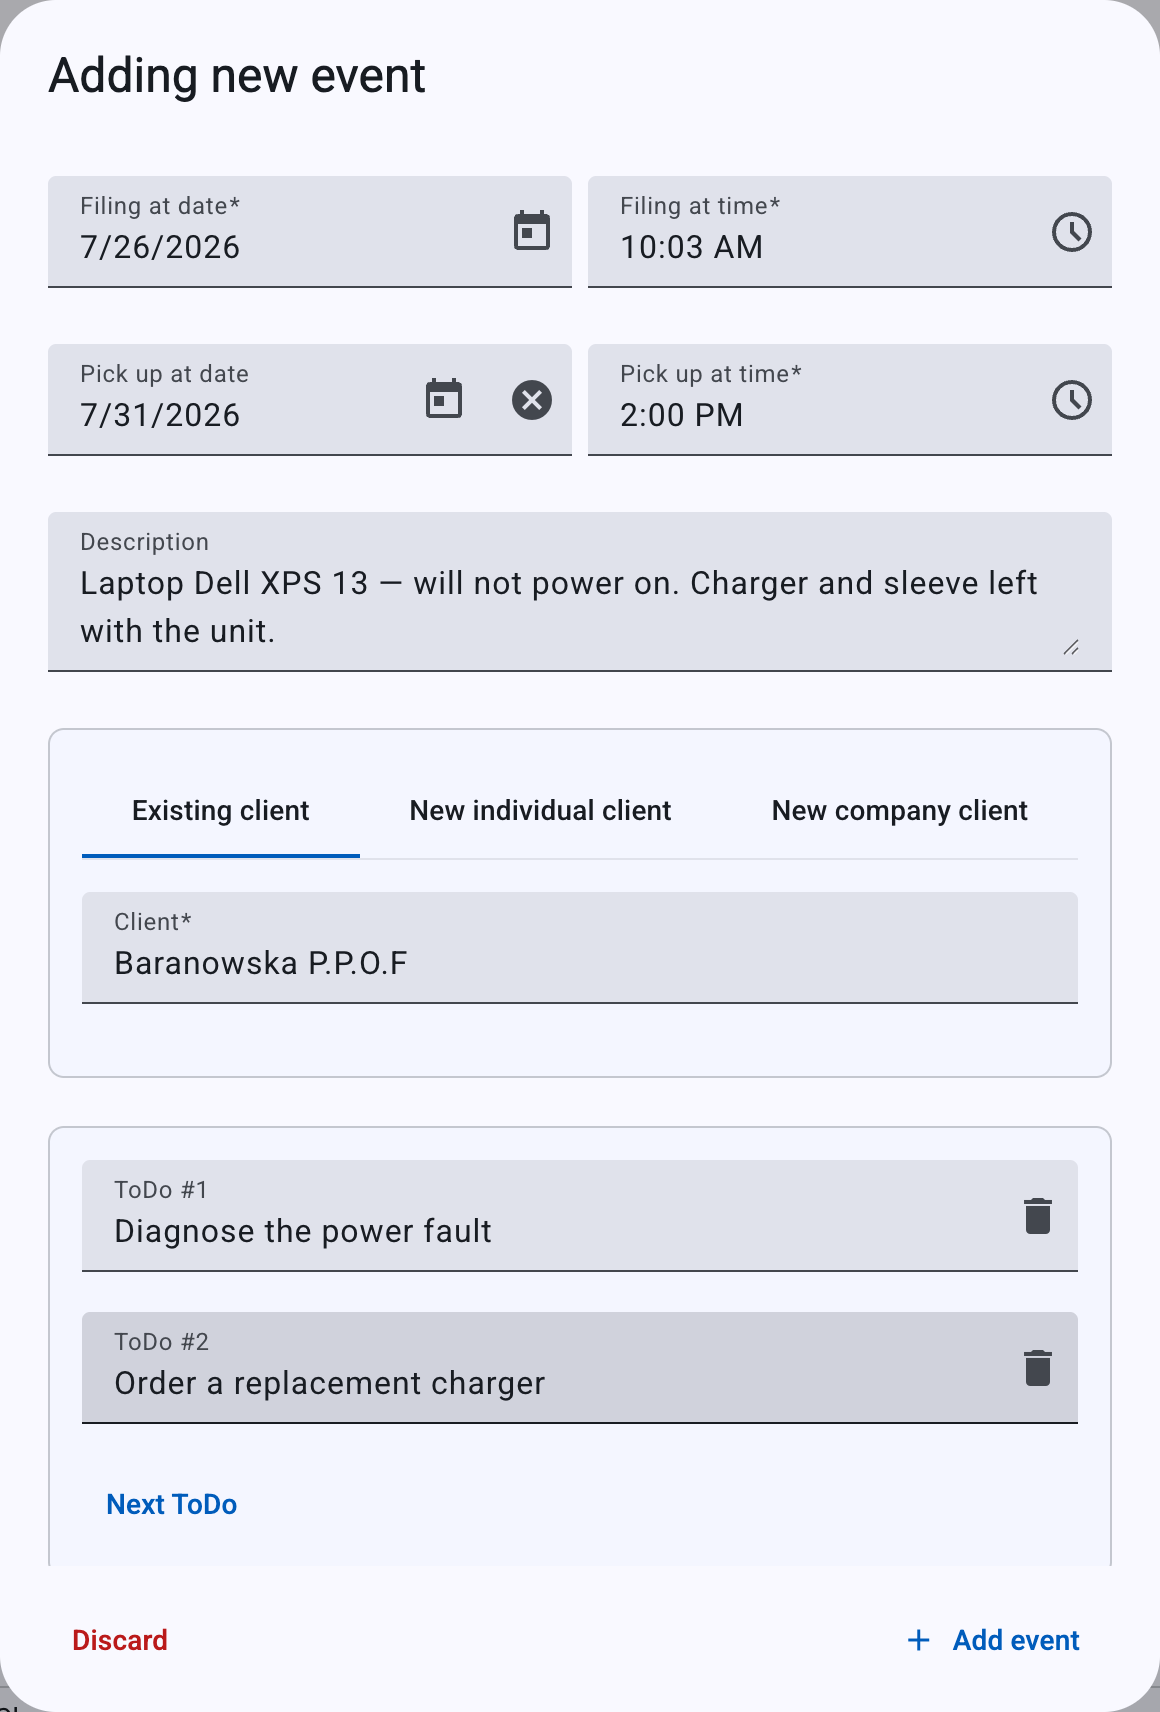
To start a new job:
- On the events list, click Add event (also available as the button on the empty state).
- The Adding new event dialog opens. It stays open until you save or explicitly discard — clicking outside it or pressing Escape will not close it silently.
- Choose the client (see Choose the client).
- Set Filing at date and Filing at time, and optionally Pick up at date / Pick up at time.
- Optionally add a Description and one or more ToDo items.
- Optionally attach files — note that files attached here become part of the service intake form and cannot be removed later (see Event files).
- Click Add event to save.
When you save, kweno.app assigns the job a sequential Event number automatically. This number is unique to your account and is how the event is identified everywhere else in the app.
Choose the client
Every event belongs to exactly one client. In the create dialog you pick the client using a three-tab group at the top:
This tab is selected by default. In the Client field (placeholder Search client), start typing the client's name; matching clients appear as you type. You must pick one from the list — a typed name that is not selected does not count.
If the client you pick is a company that has subordinate units, a Subordinate unit dropdown appears. Its first option is None; each unit below it is shown as its name followed by its IDWew or own TIN in parentheses. Choosing a subordinate unit is optional.
Fill in the inline individual-client form to create the person and attach them to the event in one step. The fields and their rules are the same as on the Clients page. When you save the event, the client is created first, then the event.
Fill in the inline company-client form to create the company and attach it to the event in one step. See Clients for the fields and validation. The client is created first, then the event.
Note
The three-tab chooser appears only when you are creating an event. When you edit an existing event, there are no tabs — you only get the Client search field (and the Subordinate unit dropdown when it applies), which you can use to switch the job to a different existing client.
Filing and pick-up dates
The Filing at datetime records when the item was dropped off. The Planned pick up at datetime is optional and records when you expect the client to collect it.
| Field | What it is | Notes |
|---|---|---|
| Filing at date | Drop-off date | Required. Defaults to today when you create an event. |
| Filing at time | Drop-off time | Required. Defaults to the current time. The picker offers preset times from 06:00 to 22:00 in 15-minute steps, but you can also type any other time. |
| Pick up at date | Planned collection date | Optional. Use the clear (Clear date) button to empty it. |
| Pick up at time | Planned collection time | Disabled until you choose a pick-up date. Once a pick-up date is set it becomes required and defaults to the current time if left empty. Clearing the pick-up date also clears and disables this field. |
Description
The Description field is an optional multi-line note about the job — what was brought in, the reported fault, anything you want on record.
Description length
The description can be at most 512 characters. There is no visible counter in the dialog, so keep notes concise; overly long text is rejected when you save.
Add To-dos while creating
While creating an event you can seed it with a checklist. Each row is labelled ToDo #N (ToDo #1, ToDo #2, and so on) and starts with one empty row.
- Click Next ToDo to add another row. Pressing Enter inside a to-do field also adds a new row and moves focus to it.
- Each row has a trash icon to remove it.
- Empty rows are dropped when you save — only rows with text are kept, and each is limited to 512 characters.
Note
To-dos can only be added in this way while creating the event. On an existing event you manage the checklist from the ToDo option instead — see To-dos.
If you change your mind
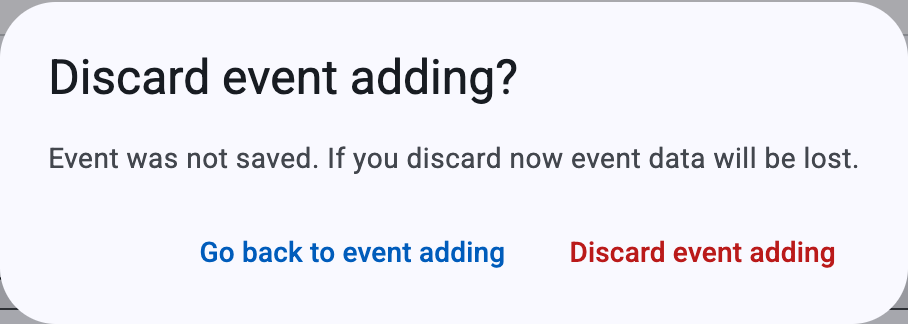
If you try to dismiss the create or edit dialog while you have unsaved changes, kweno.app asks you to confirm. When creating, the dialog is titled Discard event adding? with the message:
Event was not saved. If you discard now event data will be lost.
Choose Go back to event adding to keep working, or Discard event adding to throw the entry away. When editing, the equivalent dialog is Discard event editing?:
Event changes were not saved. If you discard now changed event data will be lost.
with Go back to event editing and Discard event editing. If nothing has been changed, the dialog closes straight away without asking.
After the event is created
As soon as a new event is saved, an Event created confirmation appears. In the background kweno.app is building the event's service intake form (see Service intake form), and this dialog reports its progress:
- While it is being prepared you see the text Generating service intake form file...
- When it is finished you see Service intake form ready to download.
This dialog has exactly two buttons: Close, and Download service intake form (which stays disabled until the form is ready).
Note
The Event created dialog only lets you close it or download the service intake form. It does not contain shortcuts to costs, working time or to-dos — you reach those from the event's row or options menu once the job is in the list.
What an event holds
An event is a container for everything about one job. Beyond the client, dates and description you set when creating it, each event carries:
- Costs — parts, materials and other chargeable items, with quantities, purchase and sale prices and (for VAT payers) VAT rates. See Costs.
- Working time — logged labour by type (Work, Travel, Shopping, Estimation, Other), with hours, minutes and an hourly rate. See Working time.
- To-dos — a checklist of tasks for the job; costs and working-time entries can be linked to individual to-dos. See To-dos.
- Event files — documents or media attached to the job while editing it; these can be removed again (see Event files).
- Service intake form — an automatically generated drop-off document, together with the files attached when the event was created; both are permanent (see Service intake form).
When you are ready to bill, you generate an invoice from the event. See Invoices & KSeF, and Corrective invoices when you need to correct one already issued.
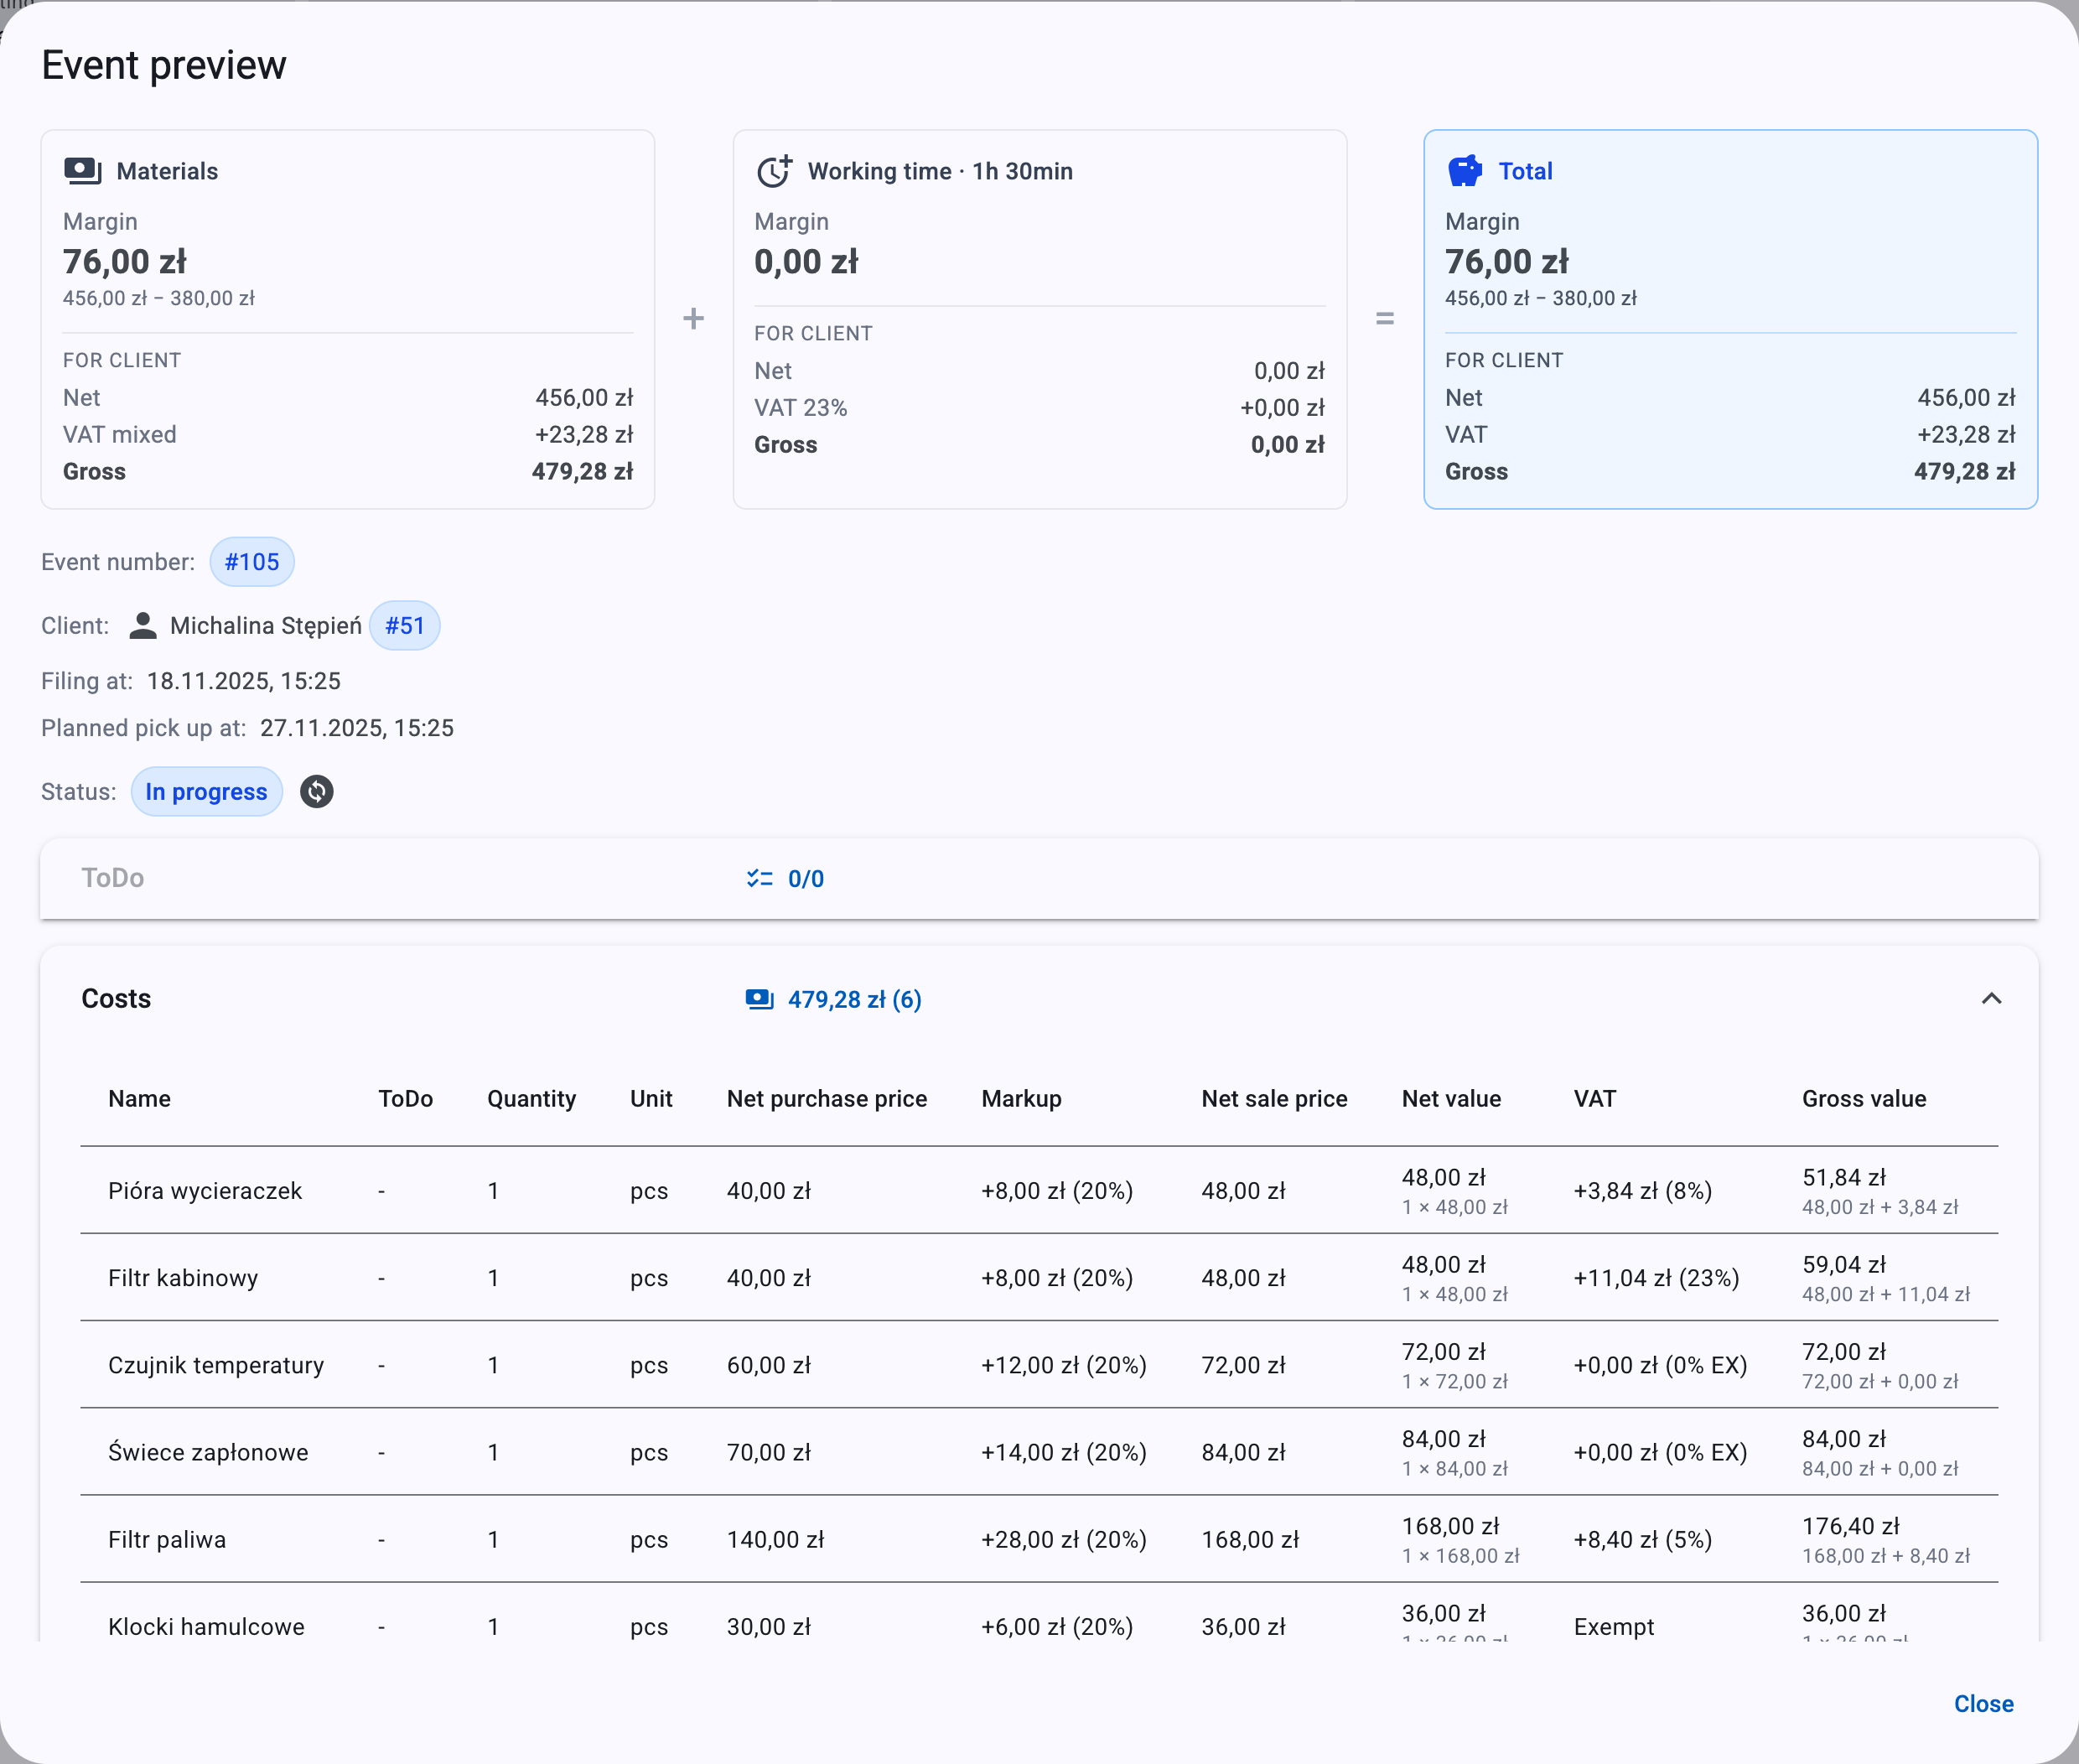
You can also open a read-only Event preview from the options menu, which gathers all of this on one screen: a Materials / Working time / Total summary, the client and date details, the current status, the description, file chips, and expandable ToDo, Costs and Working time tables.
Event statuses
Every event has one of six statuses. They tell you where the job is in its lifecycle and drive the colour-coded badge shown in the list.
| Status | Typical meaning |
|---|---|
| New | Just filed; not started yet. This is the status every new event starts in. |
| In progress | Work is under way. |
| Waiting for parts | Paused pending materials. |
| Waiting to be picked up | Finished; ready for the client to collect. |
| Received | The client has collected the item. |
| Canceled | The job will not proceed. |
You change the status in two places, both offering the same six choices (the current status is greyed out):
- Click the change icon next to the Status badge in the list or in the event preview, then pick a status.
- Open the event's options menu and choose Change status, then pick a status from the submenu.
For a full description of each status and when to use it, see Event statuses.
First invoice moves the status automatically
When you issue and send the first invoice for an event to KSeF, kweno.app automatically moves the event to Waiting to be picked up (only if it was still New, In progress or Waiting for parts). The invoice dialog warns you first:
This is the first invoice for this event. Issuing and sending it to KSeF will change the event status to "Waiting to be picked up".
See Invoices & KSeF for the full issuing flow.
Browse and find events
When you have events, the list shows them with an Add event button and a view toggle at the top.
Table vs grid view
- On large screens the list defaults to a table. The button reads Show grid view to switch to cards, and Show table view to switch back.
- On smaller screens the layout automatically switches to a grid of cards showing the same information as labelled rows.
The table columns, in order, are: Event number, Client, Filing at, Planned pick up at, Status, ToDo, Costs, Working time, and an options column. Dates are shown in your own timezone and locale.
The ToDo, Costs and Working time cells double as buttons:
- ToDo shows completed-over-total (for example
2/5) and opens the to-do view. - Costs shows the total gross value with the number of cost items in parentheses; it opens the costs view.
- Working time shows the summed time in hours (and minutes when non-zero); it opens the working-time view.
Sorting and filtering
Above the list, several controls narrow and order what you see. Changing any of them refreshes the list and returns you to the first page.
- Sorting — a single choice from Event number, Client, Filing at and Planned pick up at, each available ascending or descending (for example Filing at (descending)). By default the list shows the newest filing date first.
- Clients — a multi-select filter. Type to find clients by name and add each as a chip; remove a chip to drop it. Leaving it empty shows events for all clients.
- Status — a multi-select of the six statuses. Leaving it empty shows all statuses.
- Filing at — a date-range filter with From filing at and To filing at. The "to" date includes the whole of that day.
- Planned pick up at — a date-range filter with From planned pick up at and To planned pick up at.
Note
The client filter is labelled Clients (plural), because you can select more than one at once.
Pagination
The list is paged. Choose 12, 24 or 48 events per page; the default is 12. First- and last-page buttons are available, and changing page scrolls you back to the top.
The options menu
Each event has a Show options menu with:
- Preview — open the read-only event preview.
- Edit — open the edit dialog.
- Change status — the status submenu described above.
- ToDo — open the to-do view. See To-dos.
- Costs — open the costs view. See Costs.
- Working time — open the working-time view. See Working time.
- Invoice — open the invoicing flow. See Invoices & KSeF.
- Download service intake form — download the drop-off document. This entry is disabled until the form is ready.
- Delete — permanently remove the event (see Delete an event).
Event files
You can attach files to an event both while creating it and while editing it, but when you attach a file decides what it becomes — and whether you can ever remove it:
| Attached | Becomes | Can be removed later? |
|---|---|---|
| While creating the event | A service intake form file — embedded into the generated intake form PDF | No |
| While editing the event | An ordinary event file | Yes |
The event preview lists the two sets separately, under Service intake form files and Event files.
To add files, click Add file and pick one or more from your computer. The dialog shows the limits:
Max number of files: 15, max file size: 10 MB
File limits
An event can hold at most 15 files, and each file may be at most 10 MB. Files that break these rules — empty (0-byte) files, files over 10 MB, or files beyond the 15-file limit — are quietly skipped when you add them, and the Add file button is disabled once you reach 15 files. If the total count would still be exceeded on save, the upload is rejected.
Removing files
While you are still filling in the create or edit dialog, every file chip has a remove button, so you can drop a file you picked by mistake before saving.
Once the event is saved, only event files can be removed: open Edit, click the remove button on the file's chip and save. The file is deleted from storage permanently.
Files attached at creation cannot be removed
Files you attach while creating an event become part of the service intake form, which is a fixed record of how the job was taken in. kweno.app offers no way to remove them afterwards — the edit dialog does not even list them, and they carry no remove button in the event preview. They disappear only when you delete the whole event.
So attach at creation only what belongs on the drop-off record. Anything you may want to withdraw later — a working photo, a draft quote, a file sent by mistake — is better added afterwards in Edit, where it becomes an ordinary event file that you can remove.
Previewing files
In the event preview, click a file chip to open the media preview, which shows the file name and renders the content inline where possible:
- Images are scaled to fit.
- PDFs open in a viewer with zoom controls: Zoom out, Reset (return to page width) and Zoom in, stepping 25% at a time between 25% and 500%.
- Videos play in a built-in player.
- Other file types download instead.
Use Previous and Next (or the Left and Right arrow keys) to move between the event's files, and Download to save the current one. Close dismisses the preview.
Service intake form
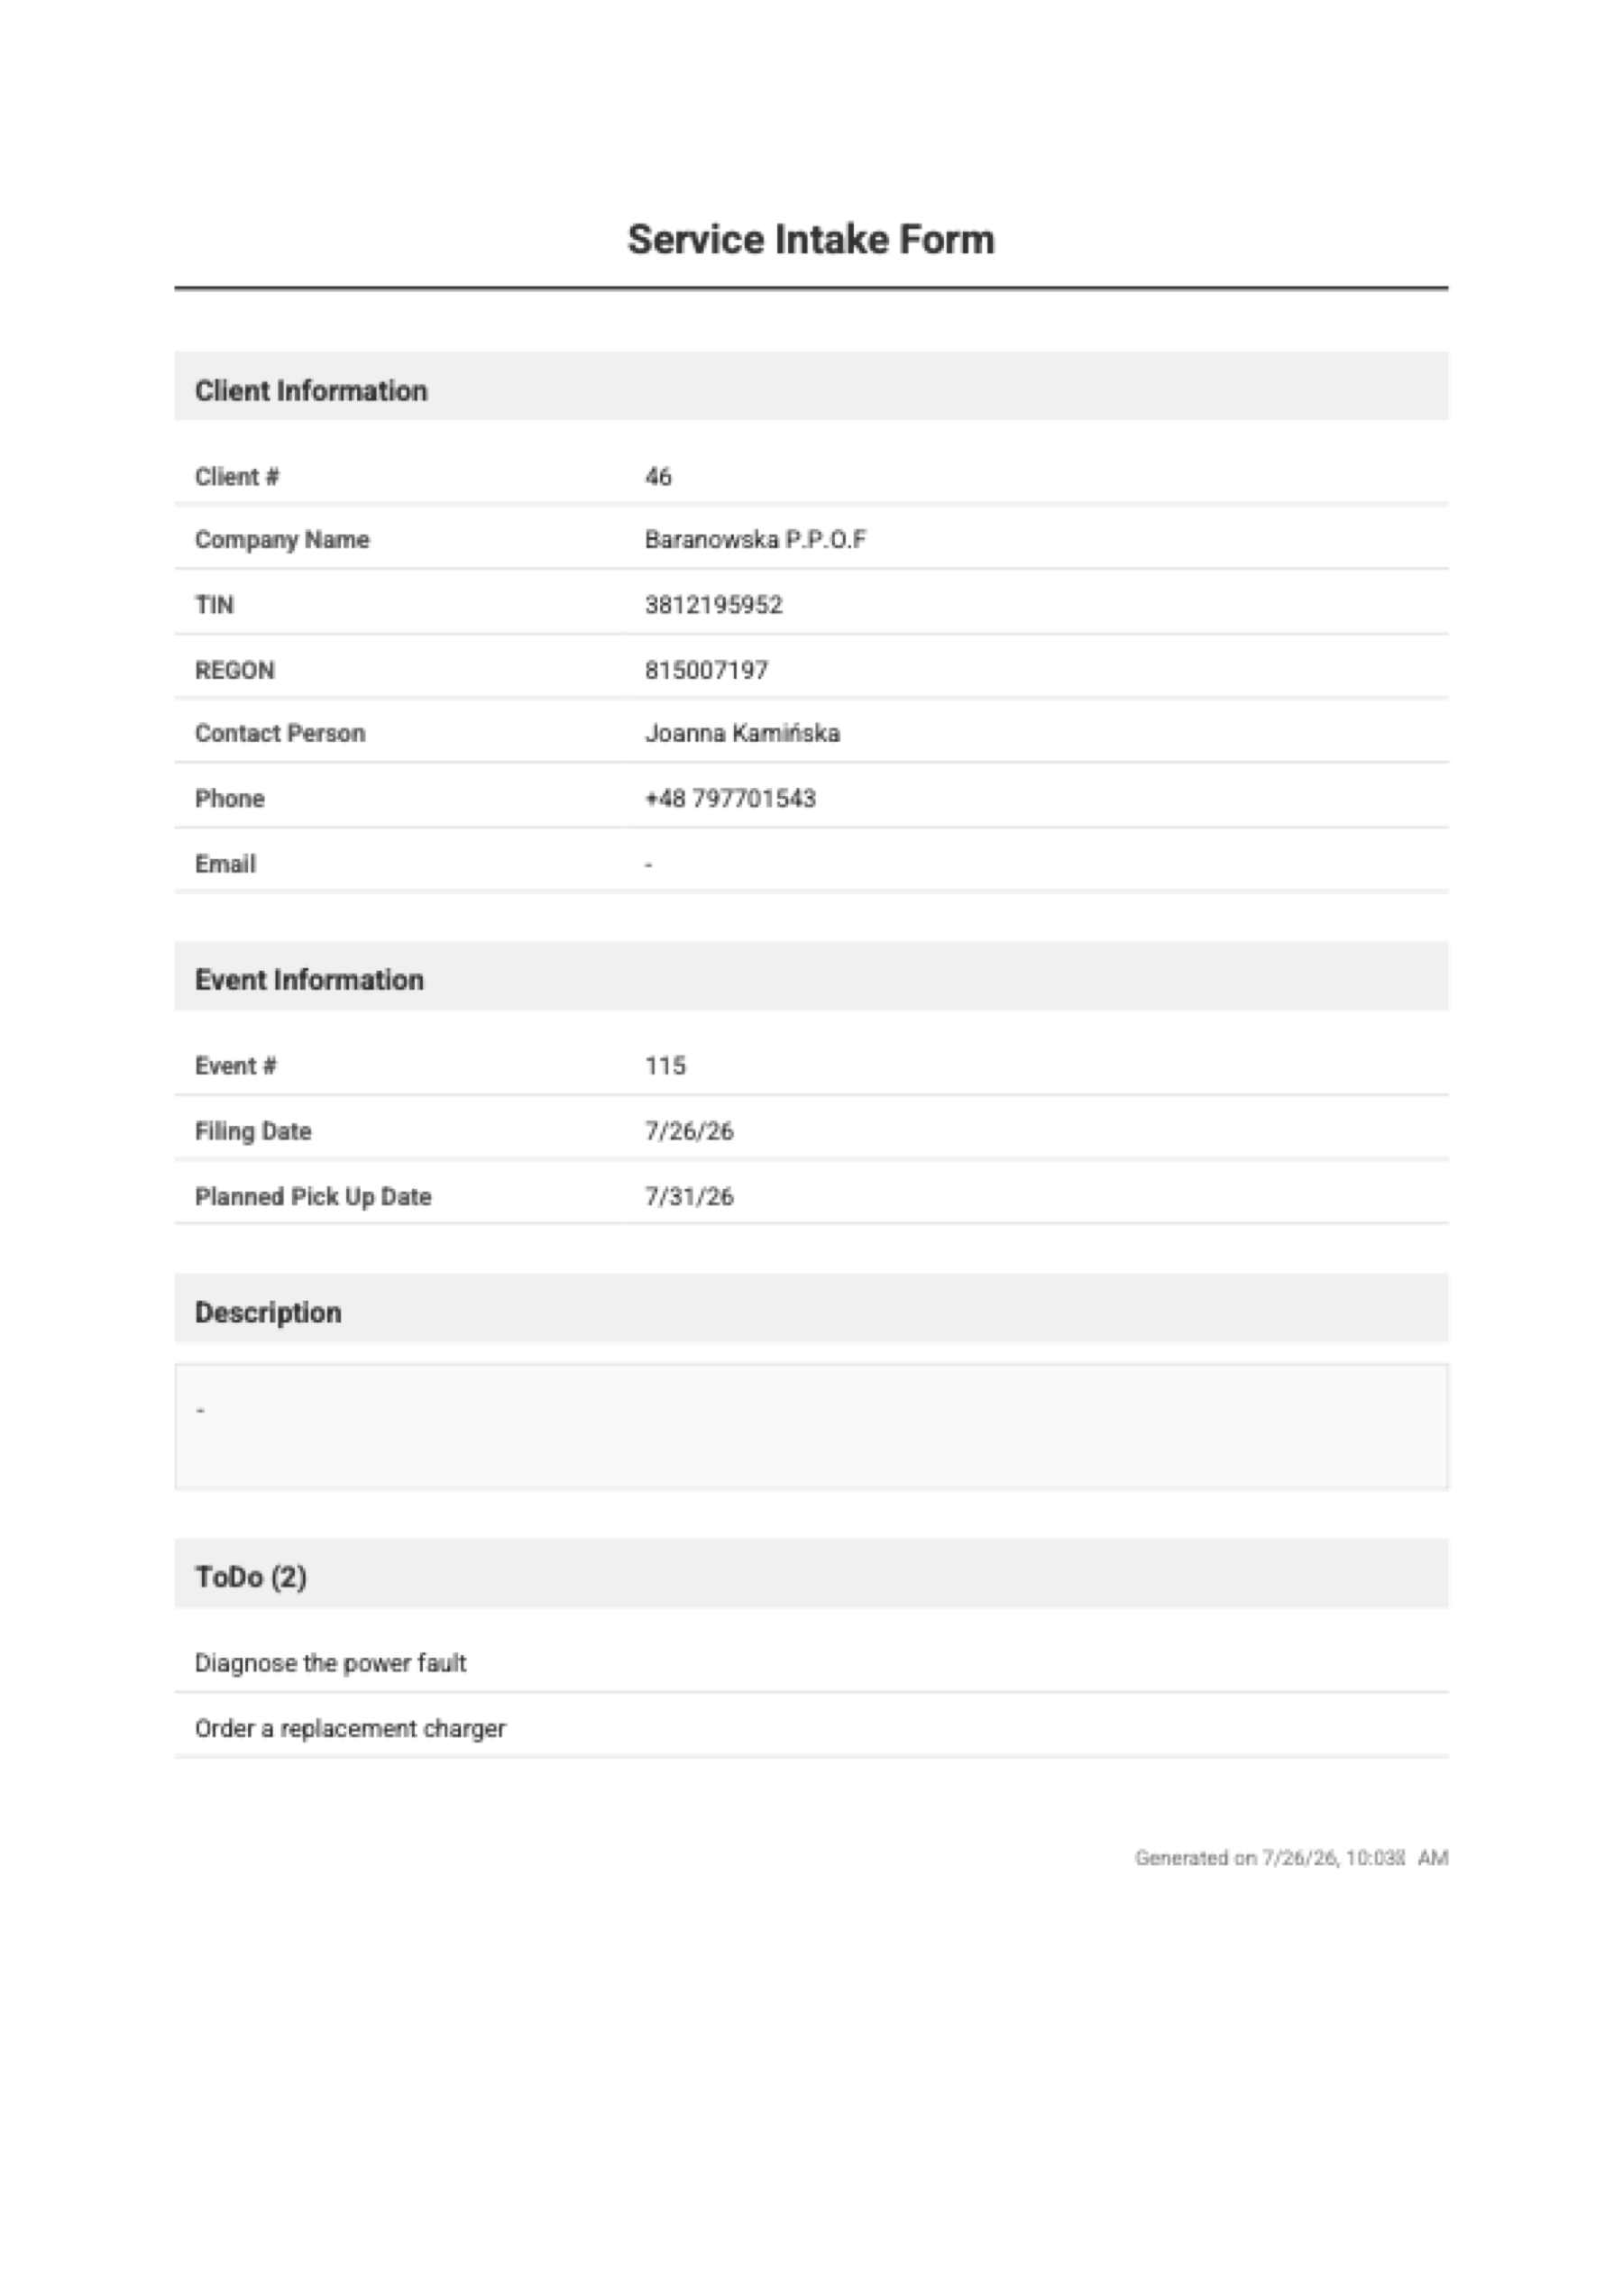
The service intake form is a PDF drop-off document kweno.app generates for every event. It captures a snapshot of the client, the event number, the filing and planned pick-up datetimes, the description, the to-dos and the attached files as they were when the event was created.
The form is prepared in the background, so it is not available instantly. Wherever you can download it — the Event created dialog and the Download service intake form option in the event's menu — kweno.app shows its progress:
- While it is being built: Generating service intake form file...
- When it is finished: Service intake form ready to download.
Once ready, downloading it saves a PDF named after the event number. The files that were attached at creation appear in the event preview under Service intake form files.
The form is generated once, at creation, and is then fixed: it cannot be edited, deleted or regenerated, and editing the event afterwards does not change it. Neither the form nor the files embedded in it can be removed on their own — see Removing files.
Delete an event
Deleting an event removes the job and everything attached to it. To delete, open the event's options menu and choose Delete. A confirmation dialog appears, titled:
Are you sure you want to delete an event?
and stating which event you are deleting, followed by:
After deleting event data will be no longer available in a system.
Choose Cancel deleting event to back out, or Delete event to proceed. After deletion the list refreshes.
Deleting is irreversible
Deleting an event also deletes all of its attached files from storage. This cannot be undone — once deleted, the event's data is gone for good.
No events yet
Before you create your first event, the list shows an empty state with the heading No events yet and the text:
Add your first event to get started.
Click Add event there to open the create dialog and begin.
Related
- Clients — create individual and company clients, and manage subordinate units used when picking a client for an event.
- Costs — record parts and materials on an event.
- Working time — log labour by type on an event.
- To-dos — manage an event's checklist.
- Invoices & KSeF — turn an event into an invoice and send it to KSeF.
- Corrective invoices — correct an invoice already issued for an event.
- Event statuses — what each status means.
- Business data — your seller details, used when invoicing an event.